
.Creating a website with WordPress is a journey filled with opportunities for customization and personalization. Customizing your WordPress Dashboard is your command center, a place where you can shape and mold your website to fit your vision. For beginners, this dashboard might seem overwhelming at first glance, but with a bit of guidance, you’ll find it to be a powerful tool in your web development arsenal. Let’s demystify the WordPress Dashboard, ensuring you have a clean, efficient workspace to start building your site.
Customizing your WordPress dashboard enables you to streamline your workflow by adding, removing, or rearranging widgets to prioritize the tools and insights that matter most to your website’s success.
Table of Contents
ToggleCustomizing Your WordPress Dashboard
The Basics of Dashboard Navigation
The WordPress Dashboard is the backend of your website, where all the magic happens. From here, you can control every aspect of your site. If you’re worried about the dashboard’s complexity, fear not. We’ll simplify it together, starting by accessing the dashboard efficiently by customizing your WordPress dashboard.
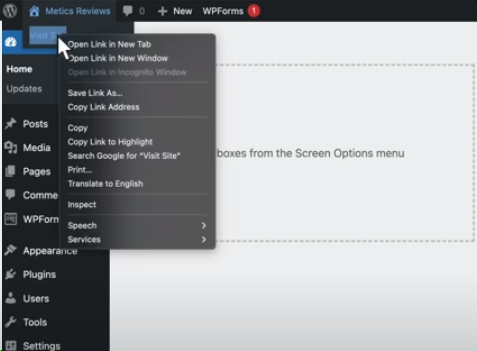
To reach your WordPress Dashboard, simply type your domain followed by “/wp-admin” in your browser. For example, “meticsreviews.com/wp-admin”. This might redirect you to a login page where you can enter the credentials created earlier. Alternatively, access it via your Hostinger dashboard by navigating to Websites > Edit Website. Bookmarking this URL in your browser ensures quick access anytime.
Streamlining the WordPress Dashboard
Decluttering Your Workspace

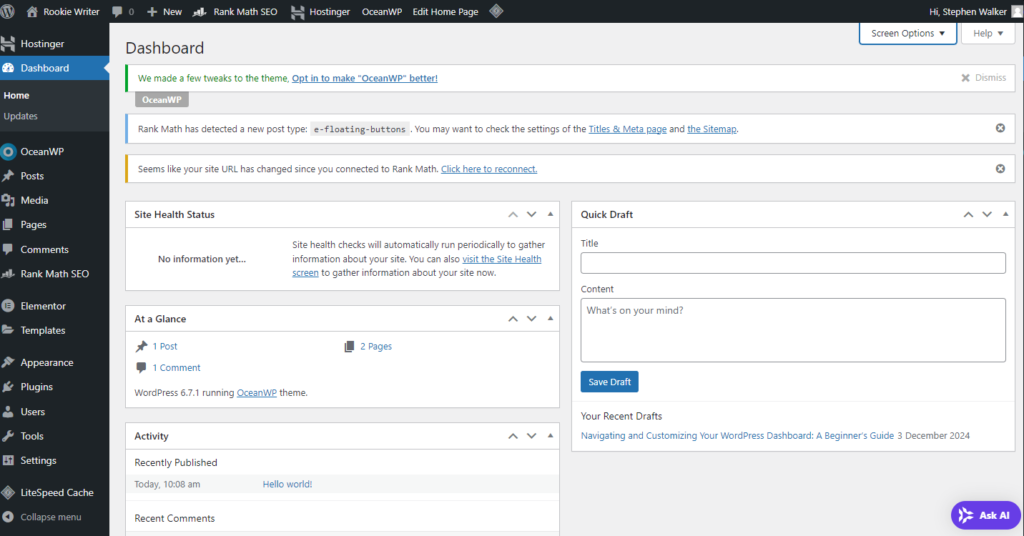
The initial view of the dashboard can be cluttered with unnecessary widgets and pre-installed elements. Cleaning up this space is our first step toward a more manageable working environment by customizing your WordPress dashboard.
Simplifying the Interface
Under the “Dashboard” menu, select “Screen Options” and deselect all options to remove unwanted dashboard widgets. This action paves the way for a cleaner interface, allowing you to focus on what’s important.
Cleaning Up Posts, Pages, and Comments
WordPress comes with sample posts, pages, and comments meant to guide new users. However, these are not necessary for your website and can be swiftly removed to ensure a fresh start.
Removing Default Content
Navigate to the “Posts” section, select the sample post, and move it to the bin. Apply the same process for the sample pages under “Pages” and clear out any default comments to declutter your site.
Customizing your WordPress dashboard is an essential step when you set up an affiliate marketing website, as it allows you to organize key tools and analytics for tracking performance and managing campaigns effectively.
Optimizing Settings for a Professional Website
Essential Settings Adjustments
Before diving into site building, tweaking some basic settings ensures your website is structured and presented professionally from the get-go.
Configuring General and Permalink Settings
Under “Settings” > “General”, update your site title to something more descriptive than the default domain name. Adjusting permalink settings is crucial for SEO and user experience. Switch the default permalink structure to a more aesthetic and functional format by selecting “Post name” and removing the trailing slash.
Disabling Comments to Avoid Spam
For new websites, managing spam comments can be a hassle. It’s advisable to disable comments entirely to focus on content creation and site development without distractions.
Adjusting Discussion Settings
In “Settings” > “Discussion”, uncheck the option to allow comments on posts. This preemptive measure keeps your site clean and focused on its primary goals.
Installing a New Theme: The First Step to Site Building
With a clean and optimized dashboard, the next step in your WordPress journey is choosing and installing a new theme. Themes dictate the visual structure and style of your site, serving as the foundation upon which your content will shine.
Selecting and Activating Your Theme
Explore the vast library of WordPress themes to find one that aligns with your vision. Installing and activating your chosen theme transforms your site’s appearance, setting the stage for further customization and content creation.
Conclusion: Ready to Build Your Website
Now that you’ve accessed, streamlined, and optimized your WordPress Dashboard, you’re well-equipped to begin the exciting process of building your website. Remember, the journey of website creation is iterative. As you grow more familiar with WordPress, you’ll discover new ways to enhance your site, attract visitors, and achieve your online goals. Start exploring, experimenting, and expressing your unique voice through your WordPress website today.
Conclusion to Customizing your WordPress dashboard
Whether you’re managing content, tracking analytics, or running an affiliate marketing website, customizing your WordPress dashboard saves time and reduces distractions. Tailoring the layout to your specific workflow ensures easier navigation and a more productive experience, empowering you to stay organized and make data-driven decisions with ease.

